Working on an HPC system
Last updated on 2025-03-08 | Edit this page
Overview
Questions
- How do I log on to an HPC system?
Objectives
- Connect to an HPC system.
- Understand the general HPC system architecture.
Logging In
The first step in using a cluster is to establish a connection from our laptop to the cluster. When we are sitting at a computer (or standing, or holding it in our hands or on our wrists), we have come to expect a visual display with icons, widgets, and perhaps some windows or applications: a graphical user interface, or GUI. Since computer clusters are remote resources that we often connect to over over slow or laggy interfaces (WiFi and VPNs especially), it is more practical to use a command-line interface, or CLI, in which commands and results are transmitted via text, only. Anything other than text (images, for example) must be written to disk and opened with a separate program.
If you have ever opened the Windows Command Prompt or macOS Terminal, you have seen a CLI. If you have already taken The Carpentries’ courses on the UNIX Shell or Version Control, you have used the CLI on your local machine somewhat extensively. The only leap to be made here is to open a CLI on a remote machine, while taking some precautions so that other folks on the network can’t see (or change) the commands you’re running or the results the remote machine sends back. We will use the Secure SHell protocol (or SSH) to open an encrypted network connection between two machines, allowing you to send & receive text and data without having to worry about prying eyes.

Make sure you have a SSH client installed on your laptop. Refer to
the setup section for more details. SSH clients
are usually command-line tools, where you provide the remote machine
address as the only required argument. If your username on the remote
system differs from what you use locally, you must provide that as well.
If your SSH client has a graphical front-end, such as PuTTY or
MobaXterm, you will set these arguments before clicking “connect.” From
the terminal, you’ll write something like
ssh userName@hostname, where the “@” symbol is used to
separate the two parts of a single argument.
Go ahead and open your terminal or graphical SSH client, then log in to the cluster using your username.
Remember to replace userid with your username or the
one supplied by the instructors. You may be asked for your password.
Watch out: the characters you type after the password prompt are not
displayed on the screen. Normal output will resume once you press
Enter.
Where Are We?
Very often, many users are tempted to think of a high-performance
computing installation as one giant, magical machine. Sometimes, people
will assume that the computer they’ve logged onto is the entire
computing cluster. So what’s really happening? What computer have we
logged on to? The name of the current computer we are logged onto can be
checked with the hostname command. (You may also notice
that the current hostname is also part of our prompt!)
What’s in Your Home Directory?
The system administrators may have configured your home directory
with some helpful files, folders, and links (shortcuts) to space
reserved for you on other filesystems. Take a look around and see what
you can find. Hint: The shell commands pwd and
ls may come in handy. Home directory contents vary from
user to user. Please discuss any differences you spot with your
neighbors.
The deepest layer should differ: userid is uniquely yours. Are there differences in the path at higher levels?
If both of you have empty directories, they will look identical. If you or your neighbor has used the system before, there may be differences. What are you working on?
Use pwd to print the
working directory path:
You can run ls to list
the directory contents, though it’s possible nothing will show up (if no
files have been provided). To be sure, use the -a flag to
show hidden files, too.
At a minimum, this will show the current directory as .,
and the parent directory as ...
Nodes
Individual computers that compose a cluster are typically called nodes (although you will also hear people call them servers, computers and machines). On a cluster, there are different types of nodes for different types of tasks. The node where you are right now is called the head node, login node, landing pad, or submit node. A login node serves as an access point to the cluster.
Avoid running jobs on the login node !
As a gateway, it is well suited for uploading and downloading files, setting up software, and running quick tests. Generally speaking, the login node should not be used for time-consuming or resource-intensive tasks. You should be alert to this, and check with your site’s operators or documentation for details of what is and isn’t allowed. In these lessons, we will avoid running jobs on the login node.
The real work on a cluster gets done by the worker (or compute) nodes. Worker nodes come in many shapes and sizes, but generally are dedicated to long or hard tasks that require a lot of computational resources.
All interaction with the worker nodes is handled by a specialized piece of software called a scheduler (the scheduler used in this lesson is called Slurm). We’ll learn more about how to use the scheduler to submit jobs next, but for now, it can also tell us more information about the worker nodes.
For example, we can view all of the worker nodes by running the command sinfo.
PARTITION   AVAIL  TIMELIMIT  NODES  STATE NODELIST
dell-gpu       up 21-00:00:0      1   idle gpu01
defq*          up 2-00:00:00      6   drng sb[019,025,029,062,069,073]
defq*          up 2-00:00:00      1  drain sb060
defq*          up 2-00:00:00     45    mix sb[001,003-004,006-007,009-012,014-015,017,023,027-028,032-036,038-039,041-045,047,050,053-054,058-059,061,066-068,072,078,084,086,092,104,108,110]
defq*          up 2-00:00:00     58  alloc sb[002,005,008,013,016,018,020-022,024,026,030-031,037,040,046,048-049,051-052,055-057,063-065,070-071,074-077,079-083,085,087-091,093-103,105-107,109]
short          up      10:00      6   drng sb[019,025,029,062,069,073]
There are also specialized machines used for managing disk storage, user authentication, and other infrastructure-related tasks. Although we do not typically logon to or interact with these machines directly, they enable a number of key features like ensuring our user account and files are available throughout the HPC system.
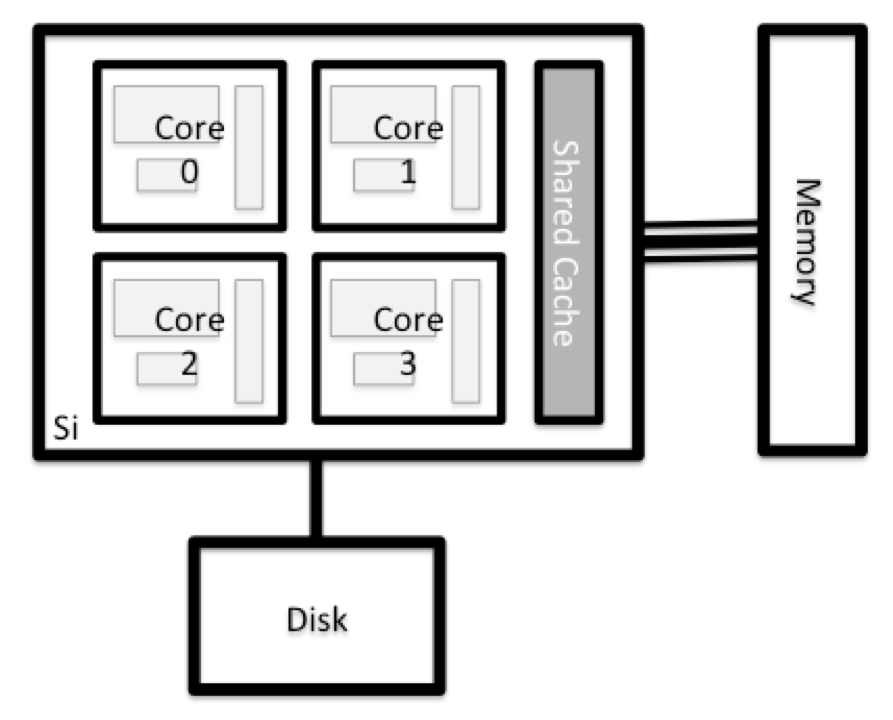
What's in a Node?
All of the nodes in an HPC system have the same components as your own laptop or desktop: CPUs (sometimes also called processors or cores), memory (or RAM), and disk space. CPUs are a computer’s tool for actually running programs and calculations. Information about a current task is stored in the computer’s memory. Disk refers to all storage that can be accessed like a file system. This is generally storage that can hold data permanently, i.e. data is still there even if the computer has been restarted. While this storage can be local (a hard drive installed inside of it), it is more common for nodes to connect to a shared, remote fileserver or cluster of servers.
There are several ways to do this. Most operating systems have a graphical system monitor, like the Windows Task Manager. More detailed information can sometimes be found on the command line. For example, some of the commands used on a Linux system are:
Run system utilities
Read from /proc
Run system monitor
Explore the login node
Now compare the resources of your computer with those of the login node.
Compare Your Computer, the login node and the compute node
Compare your laptop’s number of processors and memory with the numbers you see on the cluster login node and worker node. Discuss the differences with your neighbor.
What implications do you think the differences might have on running your research work on the different systems and nodes?
Differences Between Nodes
Many HPC clusters have a variety of nodes optimized for particular workloads. Some nodes may have larger amount of memory, or specialized resources such as Graphical Processing Units (GPUs).
Filesystems
Home Directory
All users have a home directory on Rocket, you arrive here whenever you log in. Although you may choose to set permissions allowing others to view files in your home directory, files stored here cannot be made available to your project leader or collaborators after you leave, so DO NOT store project work here.
Project Directory
All users on Rocket are members of one or more registered projects,
and each project has a directory on /nobackup for shared
files. For the duration of this course you have been made a member of
the training project. /nobackup/proj/training
Work Directory
Create a directory under our training project directory
to store your work on Rocket. CHECK: Can your collaborators read files
you create?
BASH
mkdir /nobackup/proj/training/userid
cd /nobackup/proj/training/userid/
touch testfile.txt
ls -la
OUTPUT
[userid@login01 userid]$ ls -la
total 8
drwx--S--- 2 userid rockhpc_training 4096 Mar  8 20:10 .
drwxrws--- 3 root   rockhpc_training 4096 Mar  8 07:42 ..
-rw------- 1 userid rockhpc_training    0 Mar  8 20:10 testfile.txt
Linux file permissions are covered in Unix Shell extras.
NOTE: By default a file you create on Rocket will allow ONLY you (the
owner) to read and write to it: -rw-------.
It’s a good idea to change permissions on new files so that your PI
and collaborators can see your work, using chmod (or
chmod -R to recurse through directories). 750
grants read permissions to everyone in your group, 755
grants read permissions to everyone:
or
Local Scratch Space
Home and project directories are accessible across the Rocket
cluster. There is also local space on each node, which can be used for
temporary files and for more efficient I/O during jobs. This space is
only accessible to that node and is always called /scratch.
When you run jobs on the compute nodes, a subdirectory will be created
on /scratch for each job and can be referred to using the
environment variable $TMPDIR. Use this rather than the top
level /scratch. it helps avoid conflicts between jobs and
allows the automatic removal of files when jobs finish. Use of
/scratch can make a significant difference to your
computations’ speed, for example if you:
- Write temporary files that are used only while a computation is running
- Read from or write to a file numerous times during a computation
- Access numerous small files
You can view the local storage on the login node you are working on
with ls /scratch
RDW - Research Data Warehouse
Research Data Warehouse storage has been designed to provide safe, secure, very-large capacity, low-performance storage to Research groups on-campus. This is the best place to store research data, but not intended for interactive use. Working data on rocket should be backed up to RDW. Data to be worked on should first be copied down to working storage (project directory).
RDW is mounted at
/rdw on the login nodes only. Project leaders can request a
share on RDW. For each project, the first 5TB are free, additional space
is charged per TB per year.
Project shares have paths like: /rdw/03/rse-hpc/ and can
also be viewed on campus Windows computers at
\\campus\rdw\rse-hpc.
- The local filesystems (ext, tmp, xfs, zfs) will depend on whether you’re on the same login node (or compute node, later on).
- Networked filesystems (beegfs, cifs, gpfs, nfs, pvfs) will be similar — but may include userid, depending on how it is mounted.
With all of this in mind, we will now cover how to talk to the cluster’s scheduler, and use it to start running our scripts and programs!
- An HPC system is a set of networked machines.
- HPC systems typically provide login nodes and a set of worker nodes.
- The standard method of interacting with such systems is via a command line interface called Bash.
- The resources found on independent (worker) nodes can vary in volume and type (amount of RAM, processor architecture, availability of network mounted filesystems, etc.).
- Files saved on one node are available on all nodes.
- Avoid running jobs on the login node